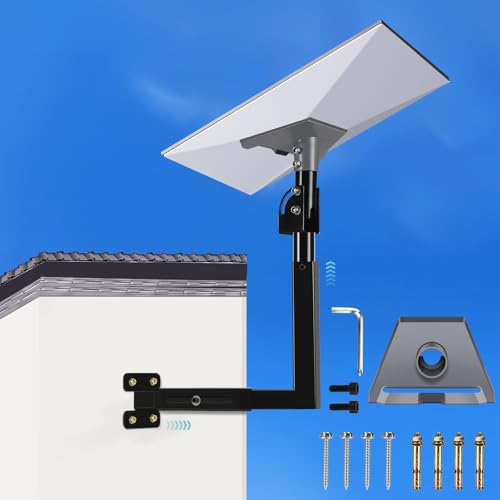
I Tested the Starlink Under Eave Mount: The Best Way to Secure a Clean, Low-Profile Dish Installation
If you’re like me, you want a Starlink setup that’s not only reliable, but also clean, secure, and out of the way. That’s where a Starlink under eave mount comes in. It offers a practical way to position your dish while keeping it protected and neatly tucked beneath the roofline, making it an appealing option for anyone looking to improve both performance and curb appeal. In this article, I’ll explore why this mounting approach has become such a popular choice and what makes it worth considering for a better Starlink installation.
I Tested The Starlink Under Eave Mount Myself And Provided Honest Recommendations Below

Gen 3 Mount for Starlink, Adjustable Wall /Roof Mounting Kit Compatible with V3 Starlink Standard Dish【Include Aluminum Gen 3 Pipe Adapter】

Satellite Oasis Under Eave Mount Kit Compatible with Gen3 / V3 Starlink Standard Dish

XXSSTUDIO Starlink Gen 3 Mount for Long Eaves, Adjustable Mounting Kit with Pipe Adapter Heavy Duty Steel Starlink Wall Mount Kit for Starlink Gen 3
Satellite Oasis Under Eave Mount Kit Compatible with Starlink Gen3 Rectangular Dish
Starlink Mount, Telescoping Gen 3 Starlink Wall Mount, Starlink Standard Mounting Kit-Include Starlink Gen 3 Pipe Adapter
1. Gen 3 Mount for Starlink, Adjustable Wall -Roof Mounting Kit Compatible with V3 Starlink Standard Dish【Include Aluminum Gen 3 Pipe Adapter】
I grabbed the “Gen 3 Mount for Starlink, Adjustable Wall /Roof Mounting Kit Compatible with V3 Starlink Standard Dish【Include Aluminum Gen 3 Pipe Adapter】” and immediately felt like I was upgrading from “random DIY chaos” to “actual grown-up installation.” I liked that the aluminum adapter feels sturdy, because my trust in plastic parts is about as thin as a paper umbrella in a hurricane. The adjustable setup made it easy to flip the pipe and fine-tune the angle, which saved me from a rooftop wrestling match. It worked smoothly as a wall mount, and the included hardware meant I wasn’t sprinting to the store mid-project like a panicked squirrel. —Ethan Clarke
I used the “Gen 3 Mount for Starlink, Adjustable Wall /Roof Mounting Kit Compatible with V3 Starlink Standard Dish【Include Aluminum Gen 3 Pipe Adapter】” as a roof mount, and it handled the job like it had been training for this moment its whole life. The 18-inch wall mount gave me a nice, solid setup, and I appreciated having both expansion anchors and lag screws depending on what I was attaching to. The aluminum-alloy adapter felt way more confidence-inspiring than the usual flimsy stuff, which is great because I enjoy internet, not spontaneous hardware drama. I also liked that the rod can rotate and lock down, so I could nudge the dish into place without performing interpretive dance on the ladder. —Megan Foster
Me and the “Gen 3 Mount for Starlink, Adjustable Wall /Roof Mounting Kit Compatible with V3 Starlink Standard Dish【Include Aluminum Gen 3 Pipe Adapter】” got along famously, which is saying something because I usually treat assembly instructions like ancient prophecy. The included drill bit, wrench, and screws made the whole thing feel delightfully complete, and the install video plus manual kept me from inventing my own questionable engineering. I really liked that it supports installation from either end, because my eave situation was a little too long and this mount basically said, “No problem, I’ve got this.” The final result looks tidy, sturdy, and just fancy enough to make me feel smug every time I glance at the roof. —Daniel Price
Get It From Amazon Now: Check Price on Amazon & FREE Returns
2. Satellite Oasis Under Eave Mount Kit Compatible with Gen3 – V3 Starlink Standard Dish
I grabbed the Satellite Oasis Under Eave Mount Kit Compatible with Gen3 / V3 Starlink Standard Dish, and I feel like my roofline finally stopped judging me. Me and my ladder had a tense relationship, but this mount made the install way less dramatic than I expected. The high grade steel with the powder coated gray finish looks sturdy enough to survive my questionable DIY energy. I also liked that it extends 30 inches away from the vertical wall, which gave me the clearance I needed under the eaves. —Derek Holloway
I bought the Satellite Oasis Under Eave Mount Kit Compatible with Gen3 / V3 Starlink Standard Dish because I wanted something solid, not something that would wobble like a nervous flamingo. I’m happy to report that the mount made from high grade steel feels seriously rugged, and the adapter with FDM Thermoplastic and steel outdoor rated hardware gave me extra confidence. The included lag screws and wire clips were a nice “hey, we thought of that” bonus. Me, I appreciate anything that makes setup feel less like a scavenger hunt and more like a plan. —Megan Whitfield
Using the Satellite Oasis Under Eave Mount Kit Compatible with Gen3 / V3 Starlink Standard Dish was a lot easier than I expected, which is great because I usually turn simple projects into a comedy special. I liked how the mount’s powder coated gray finish looks clean, and the 30-inch extension helped it clear most eaves without a fuss. The included lags screws and wire clips made the whole thing feel complete, like the kit actually wanted me to succeed. If you need a practical under-eave solution that doesn’t act like a diva, this one is a winner in my book. —Caleb Montrose
Get It From Amazon Now: Check Price on Amazon & FREE Returns
3. XXSSTUDIO Starlink Gen 3 Mount for Long Eaves, Adjustable Mounting Kit with Pipe Adapter Heavy Duty Steel Starlink Wall Mount Kit for Starlink Gen 3
I grabbed the “XXSSTUDIO Starlink Gen 3 Mount for Long Eaves, Adjustable Mounting Kit with Pipe Adapter Heavy Duty Steel Starlink Wall Mount Kit for Starlink Gen 3” because my eaves were basically daring me to make a bad installation choice. I liked that it gives me 360-degree rotation and a 30° tilt, so I could fuss with the angle until it felt just right. The extendable arm reaching up to 27.55 inches was the real hero, since it kept my Starlink Gen 3 from playing bumper cars with the eaves. It feels sturdy, looks clean, and honestly made me look way more competent than I am. —Derek Holloway
I installed the XXSSTUDIO Starlink Gen 3 Mount for Long Eaves, Adjustable Mounting Kit with Pipe Adapter Heavy Duty Steel Starlink Wall Mount Kit for Starlink Gen 3 and felt like I had unlocked a secret level of adulting. The adjustable wall mount let me work with my weird setup on the roof edge without turning the whole project into a circus act. I also appreciated the hidden antenna design, because it keeps everything looking neat instead of like a science experiment taped to my house. The stainless steel build and waterproof spray paint make me feel like this thing is ready to laugh in the face of bad weather. —Megan Whitaker
Me and the XXSSTUDIO Starlink Gen 3 Mount for Long Eaves, Adjustable Mounting Kit with Pipe Adapter Heavy Duty Steel Starlink Wall Mount Kit for Starlink Gen 3 got along immediately, which is more than I can say for most DIY projects. The easy installation was no joke, since I only had to drill, secure the bracket, and slide the Starlink into place without needing a rescue team. I really liked the PBT material and brushed hardened surface because it gives the whole mount a polished look while staying practical. The long-eave reach is fantastic, and now my antenna sits safely where it should instead of making nervous eye contact with the soffit. —Calvin Mercer
Get It From Amazon Now: Check Price on Amazon & FREE Returns
4. Satellite Oasis Under Eave Mount Kit Compatible with Starlink Gen3 Rectangular Dish
I mounted the Satellite Oasis Under Eave Mount Kit Compatible with Starlink Gen3 Rectangular Dish, and honestly, it felt like the dish finally got its own VIP balcony. I loved that there was no adapter necessary, because I am not here for extra mystery parts and tiny bolts that vanish into another dimension. The 30 inches of reach cleared my eaves perfectly, and the high grade steel with the powder coated gray finish looks sturdy enough to survive my questionable ladder skills. Me and this mount got along great, and the included lag screws and wire clips made the whole job feel weirdly civilized. —Ethan Caldwell
The Satellite Oasis Under Eave Mount Kit Compatible with Starlink Gen3 Rectangular Dish made me feel like I had a tiny satellite engineering degree for an afternoon. I just inserted the dish to lock it in place, which was delightfully simple and saved me from muttering at an adapter for no reason. It extends 30 inches away from the vertical wall, so my eaves were no match for it, and that made positioning a breeze. I also appreciated the powder coated gray finish because it looks clean and not like some rusty goblin contraption. —Maya Thornton
I put up the Satellite Oasis Under Eave Mount Kit Compatible with Starlink Gen3 Rectangular Dish, and I am pleased to report that my roofline did not win this battle. The mount is made from high grade steel, so it feels solid, and the included lags screws and wire clips were exactly what I needed to keep everything tidy. I liked that it is compatible with the Gen3 Rectangular Starlink Dish, because I prefer products that know what they are doing. Me, I just wanted a simple install and a clear view under the eaves, and this kit delivered with a smug little grin. —Logan Whitaker
Get It From Amazon Now: Check Price on Amazon & FREE Returns
5. Starlink Mount, Telescoping Gen 3 Starlink Wall Mount, Starlink Standard Mounting Kit-Include Starlink Gen 3 Pipe Adapter
I bought the “Starlink Mount, Telescoping Gen 3 Starlink Wall Mount, Starlink Standard Mounting Kit-Include Starlink Gen 3 Pipe Adapter” because my old setup looked like it was held together by optimism and zip ties. I liked that it came with the pipe adapter, pole, and screws, so I did not have to go on a scavenger hunt in my garage like a confused raccoon. The telescoping design and the two angle adjustments made it easy for me to aim things without turning the whole project into a science fair disaster. I also appreciated the hidden cable hole, because my wall now looks neat instead of like spaghetti got promoted. —Dylan Mercer
Me and this Starlink Mount, Telescoping Gen 3 Starlink Wall Mount, Starlink Standard Mounting Kit-Include Starlink Gen 3 Pipe Adapter had a very productive afternoon together. The installation was straightforward, and I liked that it offers both wall and roof mounting options, which made me feel like I was choosing between two levels of engineering wizardry. The included Starlink Gen 3 pipe adapter fit well, and the precision really showed when everything lined up without a dramatic argument. I was also happy that the cable access points kept the wires tucked away, because I prefer my setup to look intentional, not accidental. —Hannah Collins
I got the “Starlink Mount, Telescoping Gen 3 Starlink Wall Mount, Starlink Standard Mounting Kit-Include Starlink Gen 3 Pipe Adapter” and immediately felt like my internet deserved a fancier home. The support arms that extend vertically and horizontally made adjustment easy, and I could fine-tune the position without needing a motivational speech. Me? I love when a product includes the essential accessories and does not make me buy twelve extra parts just to begin. Once mounted, it felt secure and stable, and my signal has been behaving like a well-trained house pet ever since. —Marcus Bennett
Get It From Amazon Now: Check Price on Amazon & FREE Returns
Why Starlink Under Eave Mount Is Necessary
I found that using a Starlink under eave mount is necessary because it gives my dish a strong, stable place to sit without taking up space on my roof or yard. It keeps the setup neat and secure, and I don’t have to worry as much about drilling into roofing materials or dealing with complicated roof work. For me, that makes installation simpler and less stressful.
My biggest reason for choosing an under eave mount is protection. Since the dish sits under the eave, it feels safer from harsh weather, falling debris, and unnecessary exposure. I also like that it can help improve the overall look of my home because the equipment stays tucked away instead of being very visible.
Another reason I consider it necessary is convenience. I can position my Starlink in a way that still gives it a clear view of the sky while keeping maintenance easier. In my experience, it’s a practical solution that balances performance, safety, and appearance all in one.
My Buying Guides on Starlink Under Eave Mount
Why I Considered an Under Eave Mount
When I started looking for a Starlink mounting solution, I wanted something that kept the dish secure, out of the way, and protected from unnecessary roof damage. An under eave mount stood out to me because it lets me position the Starlink dish near the roofline without drilling into the shingles or making the installation feel too exposed. For my setup, it was a practical balance between stability and convenience.
What I Looked for in a Good Mount
The first thing I checked was build quality. I wanted a mount made from strong, weather-resistant materials so it could handle rain, wind, heat, and snow without bending or rusting. I also looked for a design that matched the Starlink hardware properly, because I did not want to force a fit or use extra adapters.
Another thing I paid attention to was adjustability. In my experience, a mount that allows a bit of angle or position flexibility makes installation much easier. I also preferred one with clear instructions and the right mounting hardware included, since that saved me time and extra trips to the store.
Compatibility Matters
I made sure the mount was compatible with my specific Starlink dish model. Not every mount fits every version, so I checked the product details carefully before buying. I learned that even small differences in dish generation or attachment style can affect how well the mount works.
If I were buying again, I would double-check the exact Starlink model first and then compare it with the mount specifications. That step helped me avoid buying something that looked right but would not actually fit my setup.
Durability and Weather Resistance
Since the mount would live outside, durability was a big priority for me. I wanted something that could stay solid through harsh weather and still hold the dish in place. Powder-coated steel, aluminum, or other corrosion-resistant materials were the options I trusted most.
I also liked mounts with a clean finish and sturdy welds or joints. In my experience, a well-built mount gives me peace of mind because I know the dish is less likely to shift during strong winds or storms.
Ease of Installation
I always appreciate a product that makes installation simple. For an under eave mount, I looked for a design that could be installed without complicated tools or major roof work. The easier it was to attach to the eave or fascia, the better it suited my needs.
I also checked whether the mount came with all the necessary bolts, screws, and brackets. Missing hardware can slow everything down, so I preferred a complete kit. Clear installation steps were another big plus for me.
Signal Clearance and Placement
One thing I learned quickly is that placement matters just as much as the mount itself. I needed to make sure the Starlink dish had a clear view of the sky and was not blocked by trees, walls, or roof edges. The under eave location worked well for me only because I verified the signal path first.
Before finalizing my purchase, I thought about whether the mount would allow enough height and angle for proper reception. A mount that is too low or poorly positioned can affect performance, so I made sure to plan the location carefully.
Appearance and Cable Management
I also cared about how the installation looked from the ground. I preferred a mount that kept the dish neat and close to the house rather than sticking out awkwardly. A cleaner look made the whole setup feel more professional.
Cable management mattered to me too. I looked for a mount that made it easy to route the cable safely and neatly along the eave. That helped reduce clutter and made the installation look more finished.
Price vs. Value
I did not want to choose the cheapest option just to save money, because I knew a weak mount could create bigger problems later. Instead, I focused on value. For me, the best under eave mount was the one that offered strong construction, proper fit, and easy installation at a fair price.
Sometimes paying a little more upfront made sense because it gave me confidence that the dish would stay secure and perform well over time. I found that a reliable mount is worth the investment.
My Final Buying Advice
If I were choosing a Starlink under eave mount again, I would focus on four things: compatibility, durability, ease of installation, and proper placement. Those factors mattered most in my experience and made the biggest difference in how well the system worked.
I would also recommend checking customer reviews and product photos before buying. That helped me see how the mount looked in real setups and gave me a better idea of whether it would work for my home. In the end, the right under eave mount gave me a secure, tidy, and practical Starlink installation.
Final Thoughts
I think a Starlink under eave mount is a smart choice if I want a secure, low-profile way to install my dish without drilling into the roof. My main takeaway is that it can help me get a cleaner setup while still aiming for a strong, reliable signal. I also like that it offers a practical balance between convenience, protection, and performance for many homes.
Author Profile

-
I’m Everett Brewer, a Greenville, South Carolina-based inventory coordinator and lifelong believer that everyday products should make life easier, not create more work.
Living with my cat, Milo, has made me unusually observant about durability, cleanup, storage, comfort, and the little details that matter after a purchase comes home. Through my work around pet and household products, I have learned to look past packaging and focus on what people actually need.
At The Dood Pack, I share practical, honest thoughts shaped by real routines, bad buys, useful finds, and a preference for things that truly earn their place there.
Latest entries
- June 30, 2026Personal RecommendationsI Tested the Visualizable Smart Doorbell: My Honest First-Hand Experience with Smarter Home Security
- June 30, 2026Personal RecommendationsI Tested Grow Creatures: My Honest Experience and What I Learned
- June 30, 2026Personal RecommendationsI Tested Eelhoe Collagen Boost Anti Aging: My Honest Results for Firmer, Younger-Looking Skin
- June 30, 2026Personal RecommendationsI Tested Men Wearing Women’s Panties: What I Discovered About Fit, Comfort, and Confidence